Imagine waking up, groggy and in desperate need of a refreshing shower, only to find that your shower head is leaking. The constant dripping noise is irritating, not to mention the wastage of water that’s hiking up your utility bills. But fret not, a leaking shower head is a common issue that you can fix yourself with a bit of time and the right tools.
Before you grab your toolbox, it’s important to understand that the leak could be coming from a couple of different places. It might be at the connection between the shower head and the shower arm, or it could be a leak inside the shower head itself. So, how do you find out?
Identifying The Source Of The Leak
Firstly, you need to identify the source of the leak. To do this, you can perform a simple test. Try to tighten the shower head with your hands (or a wrench, if it’s too tight). If the leak stops, the problem was likely with the connection between the shower head and the arm. However, if the shower head continues to leak even after tightening, then the issue is likely with the shower head itself.
Another common source of leaks is the faucet. If you notice that the shower head is leaking even when the faucet is off, then the issue is probably due to faulty internal parts of the faucet. Knowing where the leak originates is crucial as it determines the steps you need to take to fix the leak.
Tools & Materials Needed For Repair
Now that you’ve identified the source of the leak, it’s time to gather your tools. Here’s what you’ll need:
- Adjustable wrench: This tool will help you loosen and tighten parts without causing damage.
- Rag: You’ll use this to protect the finish of your shower head and arm when using the wrench.
- Replacement rubber washer or O-ring: If the shower head itself is leaking, you’ll likely need to replace the rubber washer or O-ring inside it.
- Plumbers/Teflon tape: This tape is used to ensure a watertight seal when you’re reconnecting the shower head to the arm.
- Small brush: A small brush (an old toothbrush will do the job) can be used to clean the threads on the shower arm and the interior of the shower head.
Most of these tools can be found in a common household toolbox. If not, they’re readily available at any local hardware store. With the right tools in hand, you’re now ready to tackle the repair. Remember, the aim is not just to stop the leak, but also to prevent future leaks. So, let’s get started.
Step-by-Step Guide To Repairing A Leaking Shower Head
Now that we’ve identified the source of the leak and gathered the necessary tools, it’s time to get down to the nitty-gritty of shower head repair. Follow these simple steps, and you’ll have your shower back in working order in no time.
Turning Off The Water Supply
The first step in repairing a leaky shower head is to turn off the water supply. This is typically done at a shut-off valve near the shower. If a local shutoff is not available, you may need to turn off the main valve. Cutting off the water supply prevents any unwanted surprises mid-repair, such as a sudden gush of water.
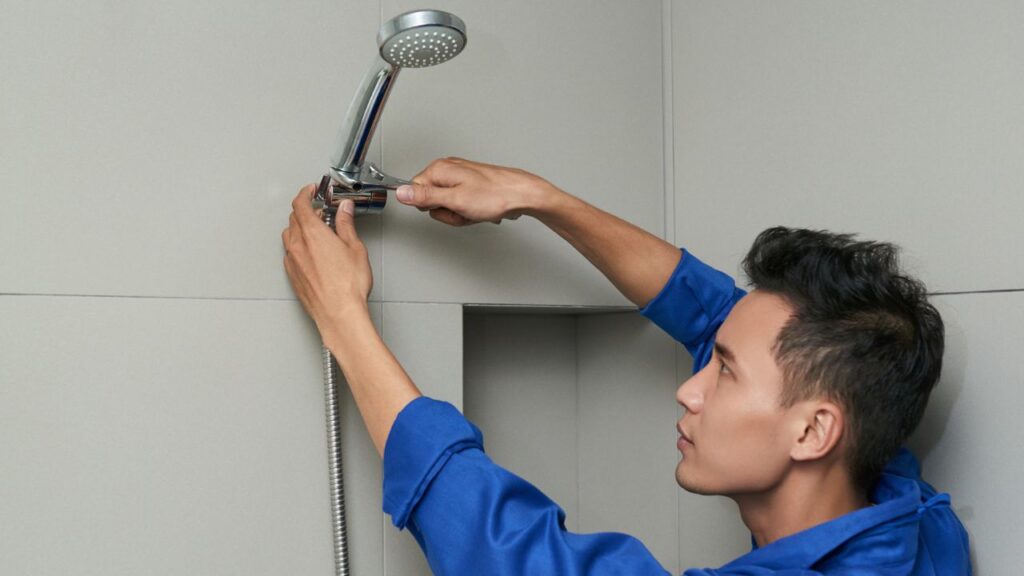
Removing The Shower Head
Next, you’ll need to remove the shower head from the shower arm. Wrap a rag around the shower head to protect its finish, and then use an adjustable wrench to loosen it. Turn the shower head counterclockwise to remove it from the shower arm. Remember to apply only as much force as necessary to avoid damaging your shower hardware.
Inspecting & Replacing The Washer/O-ring
Once the shower head is removed, look for the rubber washer or O-ring within the connection. This small but critical component helps ensure a tight seal, and a worn or damaged washer is often the culprit behind a leak. If the washer appears degraded or is missing altogether, replace it with a new one that matches the original in size and shape.
Cleaning The Shower Head & Threads
While the shower head is off, take this opportunity to clean it thoroughly. Over time, mineral buildup can accumulate on the shower head and the threads of the shower arm, which can interfere with the seal and contribute to leaks. Use a small brush, like an old toothbrush, to scrub away any mineral buildup. A clean shower head and arm not only help prevent leaks but can also improve water flow and pressure.
Applying Plumbers Tape For A Watertight Seal
After cleaning, it’s time to apply plumbers or Teflon tape. This tape helps create a watertight seal between the shower head and arm, preventing leaks. Wrap the tape around the threads of the shower arm in one or two loops, making sure to cover all the threads. Remember to wrap the tape in the same direction that the shower head will be turned onto the arm (usually clockwise).
Applying plumber’s tape is a simple but crucial step in repairing a leaky shower head. This tape provides an additional layer of protection against leaks, ensuring that your hard work doesn’t go to waste. So, don’t be tempted to skip this step, even if it seems minor.
Reassembling & Reattaching The Shower Head
Once the shower arm threads are wrapped snugly in plumber’s tape, it’s time to put your shower back together. Start by securing the shower head back onto the arm. You’ll do this by turning the shower head clockwise onto the arm. Tighten it as much as you can by hand. To avoid damaging the finish, wrap a rag around the shower head before using the adjustable wrench for final tightening. Be careful not to over-tighten, as this can strip the threads or damage the shower head.
Testing For Leaks & Troubleshooting
Now, it’s time to see the fruits of your labor. Slowly turn the water supply back on, and keep a close eye on your shower head. If everything went as planned, your shower should be functioning normally with no leaks. In case the shower head is still dripping, don’t panic. Check the connection between the shower head and the arm, ensuring the washer is seated properly and the connection is tight. If all else fails, you may need to repeat the process or seek professional help.
Maintenance Tips To Prevent Future Leaks
Regular maintenance can prevent future leaks and extend the life of your shower head. Get into the habit of cleaning your shower head regularly to prevent mineral buildup. If hard water is a problem in your area, consider installing a water softener. High water pressure can also lead to leaks, so a pressure-reducing valve might be a good investment.
It’s also a good idea to keep an eye on your water bill. A sudden increase could be a sign of a leak. If you suspect a leak, don’t ignore it. Addressing the issue early can save you money and prevent damage to your home.
Conclusion
Fixing a leaking shower head might seem like a daunting task, but with the right tools and guidance, you can do it yourself. Not only will you save money on plumber’s fees, but you’ll also get the satisfaction of solving the problem with your own two hands. So next time you hear that annoying drip, drip, drip, roll up your sleeves and fix that leak!
Remember, if the problem persists even after following the steps outlined in this guide, it might be best to call in a professional. There’s no shame in asking for help, especially when it comes to the comfort and functionality of your home.
Happy repairing!