Imagine walking into a room and being greeted by the warm and inviting look of wood flooring. Now, visualize achieving this aesthetic without the high cost and complex maintenance of real wood. This is the magic of laminate wood flooring. It offers the beauty of hardwood with the added benefits of affordability and ease of maintenance. But what’s even better is that installing laminate flooring is a task you can take on yourself. Yes, you read that right! You can roll up your sleeves and transform your space without breaking the bank.
Whether you’re a seasoned DIY enthusiast or a beginner looking to take on a new home improvement project, installing laminate wood flooring is a great place to start. Its simple click-and-lock design makes it quite approachable for most DIYers. However, like any other project, the key to a successful installation lies in proper planning and preparation. So, let’s walk through the process together, shall we?
Tools & Materials Needed For Installation
First things first, let’s gather our tools and materials. To install laminate wood flooring, you don’t need a plethora of specialized tools. Here’s what you will need: a hand saw or circular saw, measuring tape, spacers, utility knife, tapping block, and pull bar. If you’re wondering why you need these specific tools, don’t worry, we’ll get to that in a bit.
For the materials, you’ll need the laminate planks, of course. But keep in mind that laminate flooring is available in a variety of styles, colors, and finishes. So, take your time to choose the one that best suits your taste and complements your decor. Additionally, you’ll need an underlayment if your chosen laminate product doesn’t come with it pre-attached. This underlayment plays a crucial role in protecting your flooring from moisture and reducing noise.
Preparing Your Space
Now that we have our tools and materials ready, let’s prepare our space. This involves two main steps: preparing the subfloor and acclimating the laminate planks.
Before you even think about laying down the laminate, you need to ensure that the subfloor is clean, dry, and level. This is a critical step because any dirt, moisture, or unevenness can interfere with the installation process and affect the final result. If there is any existing flooring, you may need to remove it. Once the subfloor is ready, sweep or vacuum it thoroughly to remove any dust or debris.
The next step, acclimation, might not seem important, but it can make or break your project. Laminate planks need to adjust to the temperature and humidity conditions of the room where they will be installed. This is what we call acclimation. To do this, leave the laminate planks in the room for at least 48 hours before installation. This will prevent them from expanding or contracting after installation, which could lead to problems like warping or gaps between the boards.
Planning The Layout & Design
Before kicking off the installation, it’s crucial to plan the layout and design of your laminate wood flooring. The way you lay your planks can significantly affect the overall look of the room. Most people prefer to install the laminate planks parallel to the room’s longest wall. This approach often results in a visually appealing effect. However, the final decision rests on your personal preference and the specific room’s architecture.
The other important aspect to consider during the planning phase is the width of the last row of planks. You want to make sure that the last row is at least 2-3 inches wide. To achieve this, you may need to trim the first row of planks. This step ensures balance and creates a neat, professional look.
Installing Underlayment For Moisture Protection
Once you’ve planned your layout, the next step is to install the underlayment. The underlayment is an essential component of laminate flooring. It serves as a barrier against moisture, thereby protecting your laminate planks from potential water damage. Besides, it also helps reduce noise, making your space quieter and more comfortable.
If your chosen laminate product doesn’t come with a pre-attached underlayment, you’ll need to install it separately. To do this, simply roll out the underlayment across the floor, ensuring it covers the entire area where the laminate will be installed. It’s a straightforward process, but it’s vital to get it right as it lays the foundation for the rest of the installation.
Laying The First Row & Setting Expansion Gaps
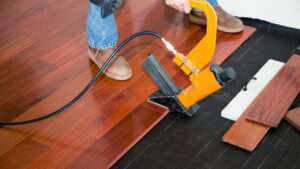
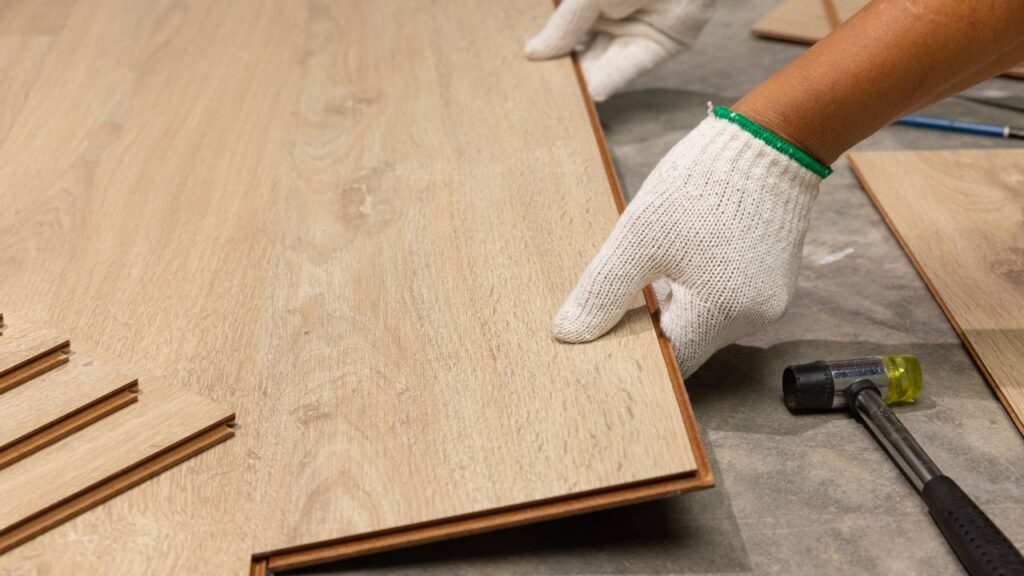
Now, it’s time to lay the first row of laminate planks. Start with the tongue side facing the wall. To achieve a clean fit, cut off the tongue along the edge of the first row. Connect the planks end-to-end by using the click-lock system, which most laminate flooring comes with. This system makes the installation process easier and faster, even for beginners.
As you lay the first row, it’s also important to set expansion gaps. These gaps accommodate any expansion of the laminate planks due to temperature and humidity changes. Place spacers between the wall and the first row of planks to create these gaps. A standard expansion gap for laminate flooring is typically 1/4 inch, but always refer to the manufacturer’s instructions for the specific product you’re using.
Staggering & Securing Planks For Stability
With the first row securely in place, it’s time to move onto the subsequent rows of laminate planks. A crucial element to remember here is to stagger your seams. What does this mean? Simply put, the end joints of adjacent rows should not line up. This staggered pattern not only enhances the appearance of your flooring but also increases its stability.
To achieve this, begin each new row with a plank cut 6 inches shorter or longer than the first plank of the previous row. This simple trick ensures that your seams are offset, adding to the professional look of the finished floor. Also, remember to use leftover pieces from previous rows whenever possible, as this helps to minimize waste.
Securing the planks together is a breeze, thanks to the click-lock system. To do this, angle the long side of each plank into the previous row, then press it down until it locks into place. For stubborn planks, your tapping block and pull bar will come in handy to ensure tight seams.
Cutting Around Obstacles & Fitting The Last Row
As you progress with your installation, you’ll inevitably encounter obstacles, such as door frames and vents. Don’t panic. With careful measurement and a bit of patience, you can navigate these hurdles. Mark the areas on the planks that need to be cut, and use a jigsaw to make notches or detailed cuts. Remember, precision is key here.
When you reach the last row, you might need to cut the planks lengthwise to ensure they fit while still allowing for the expansion gap. Again, your trusty measuring tape and saw will be essential tools for this task. Once cut, use a pull bar to snap the final row into place next to the wall.
Finishing Touches
As you lay your last plank, you’re almost at the finish line. But before you start celebrating, there are a few finishing touches to take care of. Start by removing all the spacers you placed around the room. Then, install baseboards or quarter-round trim to cover the expansion gap. Be careful not to nail through the laminate planks, as this can damage them and potentially ruin your new floor.
And there you have it! Your laminate wood flooring, expertly installed by none other than yourself. With a bit of planning, the right tools, and a dash of DIY spirit, you can transform any room in your home with beautiful, durable laminate flooring.
Remember, laminate flooring installation isn’t a race. Take your time, work methodically and, most importantly, enjoy the process. After all, there’s nothing quite like the sense of accomplishment that comes from completing a home improvement project with your own two hands.